

Hello there, dear readers! I’m here to share an exciting DIY journey that’s been brewing in my mind (Halloween pun intended). Let’s kick off this exciting project together, shall we?
It all began when I stumbled upon a simple wood hutch on Facebook Marketplace. I immediately saw the potential for it to radiate new charm.
Lately, I have been inspired by coastal cottage style home decor. There’s an authentic and timeless appeal to it, and I think it works well in so many different home styles.

Armed with a paintbrush and a clear vision, I set out to breathe new life into this already beautiful hutch. I’m eager to walk you through every step of this transformation, from the moment I discovered it online to the final result.
Finding the Hutch and Bringing it Home
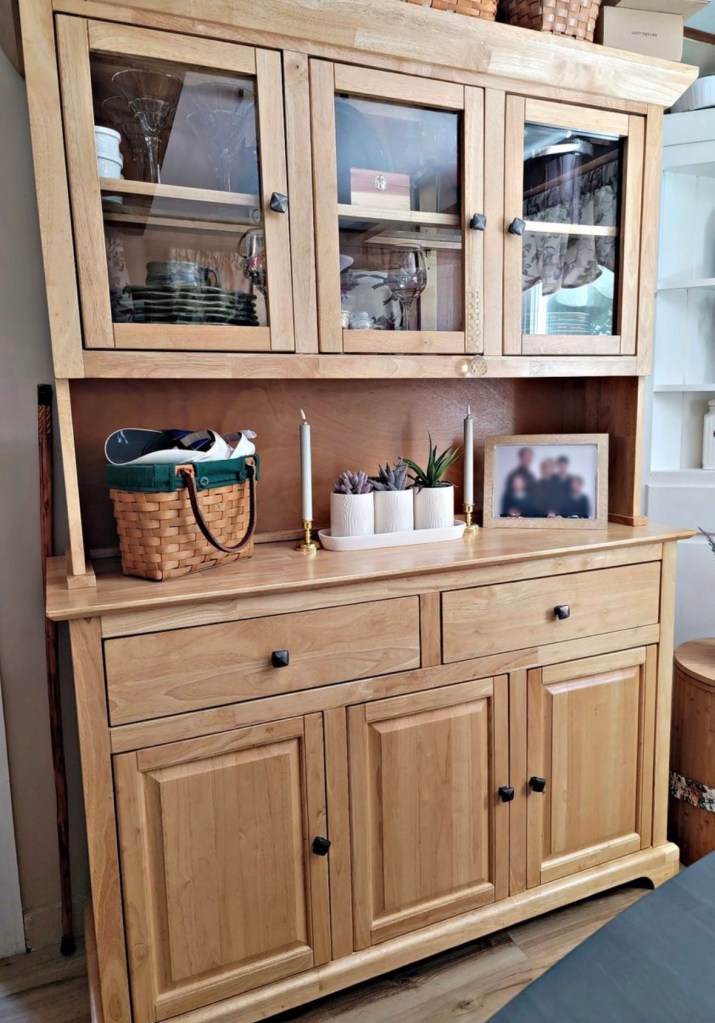
Knowing I would eventually like to find a cabinet or serving piece for our dining room, I set an alert for “hutch” on Facebook Marketplace. Surprisingly, it took a few months before the right item popped up. But, with some patience, I did eventually find what I was looking for. Here she is in all her glory. Straight lines (check). Solid wood (check). Serving top (check). Inset cabinet doors (check).

My husband picked up the hutch (literally, carried each piece by himself into our house)! Once we had it in our space and the hardware removed, I almost, for a second there, felt like it would be fine as-is. However, I had a vision and wanted to see it through.
Painting the Hutch
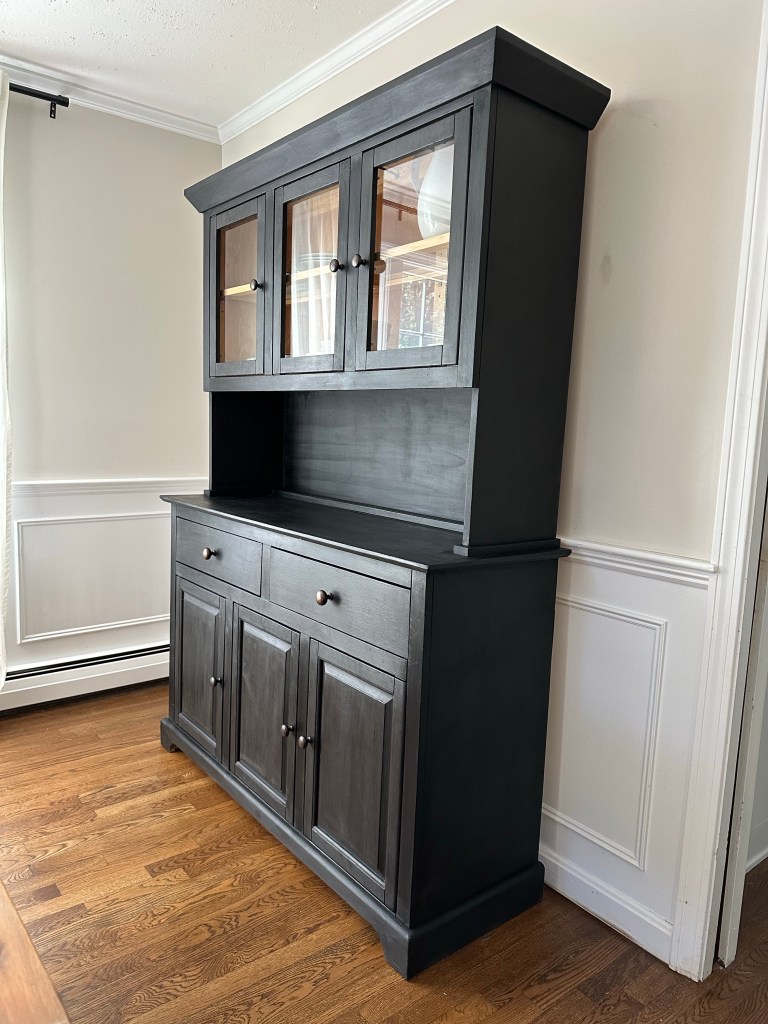
There are so many ways to paint furniture. For this project, I knew I wanted to use a chalk paint so I could have a natural finish with a rustic feel. I settled on Annie Sloan in the color “Graphite.” Graphite is a very soft black, which can be finished to look lighter, darker, or even like a warm brown depending on the finishing wax you use. (Full disclosure: I had a nearly full can of Annie Sloan Graphite in my basement from a project I started years ago, so I was also excited to try this color and use up my existing supply.)


My favorite thing about chalk paint is the minimal prep. You do not have to sand off the old finish, although you can. For this project, we cleaned the hutch thoroughly with soap and water, removed doors, and used painter’s tape to protect the inside wood, which we decided not to paint. We did not sand off the existing clear finish.


I realized after painting the first side of the hutch that I absolutely did not shake the can of paint enough before painting. The paint was going on thin and streaky. Oops. After I shook the can and stirred thoroughly, the paint had beautiful coverage. Chalk paint settles right into the wood and looks and feels matte.
Due to using an old can of paint that had been opened and closed a few times, I noticed the paint sometimes left a slight texture from dried specks from the paint can. To me, this was perfectly fine because I was hoping for an aged look. But for others wanting a factory finish, go ahead and buy yourself a brand new can of paint and shake it very well before opening. Pour some paint in a painter’s cup and promptly seal your can so the paint does not dry out at all.

My husband and I took turns painting and entertaining the kids. It became a group project. Together, we did two total coats of paint. We planned to use Annie Sloan’s black wax, which would further darken the piece and hide small imperfections. If you are using a clear wax, you may have different results.

Wax as a Topcoat
Chalk paint always needs a topcoat. We have used both wax and polyurethane, and for this project, we went with Annie Sloan’s black wax. With wax, start small. You paint it on lightly, and then buff it with a clean cloth once dry for a smooth finish. You do not want too much excess, or it will feel almost sticky even after buffing and curing. We applied a little too much wax on this one, so we had to do some extra buffing.
Curing can take between 5 and 21 days depending on the temperature inside your home. However, you can use your finished piece straight away. We waited about 5 days to install the cabinet doors and add the “new” hardware.
Final Touches
To keep costs down, I found secondhand round bronze knobs. They look beautiful and feel substantial, and I like that the deep bronze only slightly contrasts with the black painted wood.


If you are still reading this, thank you! I had no idea I could say so much about a black hutch. We love it and are very happy with the results. Now it is time to style it!
SOURCES:
Paint: Annie Sloan Chalk Paint in Graphite, we used about 1.5 of the liter cans: HERE; Similar color, different brand: HERE
Wax: Annie Sloan Black Wax: HERE; Similar color, different brand: HERE
Brush for paint: HERE; We also used this angle brush: HERE
Brush for wax: Annie Sloan HERE, we have used this one as well HERE, much cheaper
Painter’s tape: HERE
Knobs: Purchased secondhand; similar HERE and HERE on Amazon
Hutch: Purchased secondhand
xoxo
Paige
Amazon links may be #commissionearned

One thought on “Aged Hutch DIY: How We Saved on a Custom Black Painted Hutch”